All Categories
Featured
Table of Contents
- – Exhaust Fan Installation Near Me Pacoima, CA
- – Instant Air Solutions
- – Commercial Exhaust Fan Installation Pacoima, CA
- – Garage Air Filtration System Pacoima, CA
- – Exhaust Fan Repairs Near Me Pacoima, CA
- – Commercial Ventilation Services Pacoima, CA
- – Industrial Exhaust Ventilation Systems Pacoi...
- – Commercial Ventilation Services Pacoima, CA
- – Commercial Ventilation Services Pacoima, CA
- – Industrial Exhaust Fan Installation Near Me ...
- – Instant Air Solutions
Exhaust Fan Installation Near Me Pacoima, CA
I've had garage air flow on my mind for a long time now. Between Eileen and I always doing jobs in the garage, we produce a great deal of fumes from paint and discoloration. Cutting wood in there also tosses a great deal of sawdust right into the air. Also when I deal with the lawn mower and other tiny engines in there, the smell of gas remains.
Nevertheless, this was not the perfect option. Numerous painting and staining jobs would rest in the garage over night filling the air with fumes, just to be aired out when the sunlight showed up and when we can open up the garage doors. Other than the noxious smells being in the garage the next early morning, it would certainly also delay the completion of these projects.
To add to the stress, I lately got a snow blower for the upcoming winter snowstorms, and that was bound to leave the garage loaded with fuel smells after usage. Much more factor to check into garage ventilation systems. Pacoima Garage Exhaust Fan. So I place my thinking cap on and strayed around the garage trying to find ventilation concepts.
In my previous home, I made use of to run a great deal of computer system equipment in the garage that would certainly generate a great deal of warm. I had actually investigated garage airing vent alternatives at that time and chosen a little fan and air vent that might be set up straight in the garage door (through a small opening that you reduced).
Commercial Exhaust Fan Installation Pacoima, CA
Throughout the winter months, the garage door vent would let all the cold air in and go down the garage temperature below the freezing factor, ruining my paints and other fluids that were not implied to be iced up. The garage door vents and exhaust option left a poor taste in my mouth ever because, and I was established not to pursue that instructions once again.
I lastly resolved on a method of airing vent the garage. I would locate an optimal venting area in the garage, and reduced a large square opening in the wall (roughly 14"x14" in between the wall studs). Then I would certainly install self-closing shutter vents on both the interior and exterior of the wall.
Garage Air Filtration System Pacoima, CA
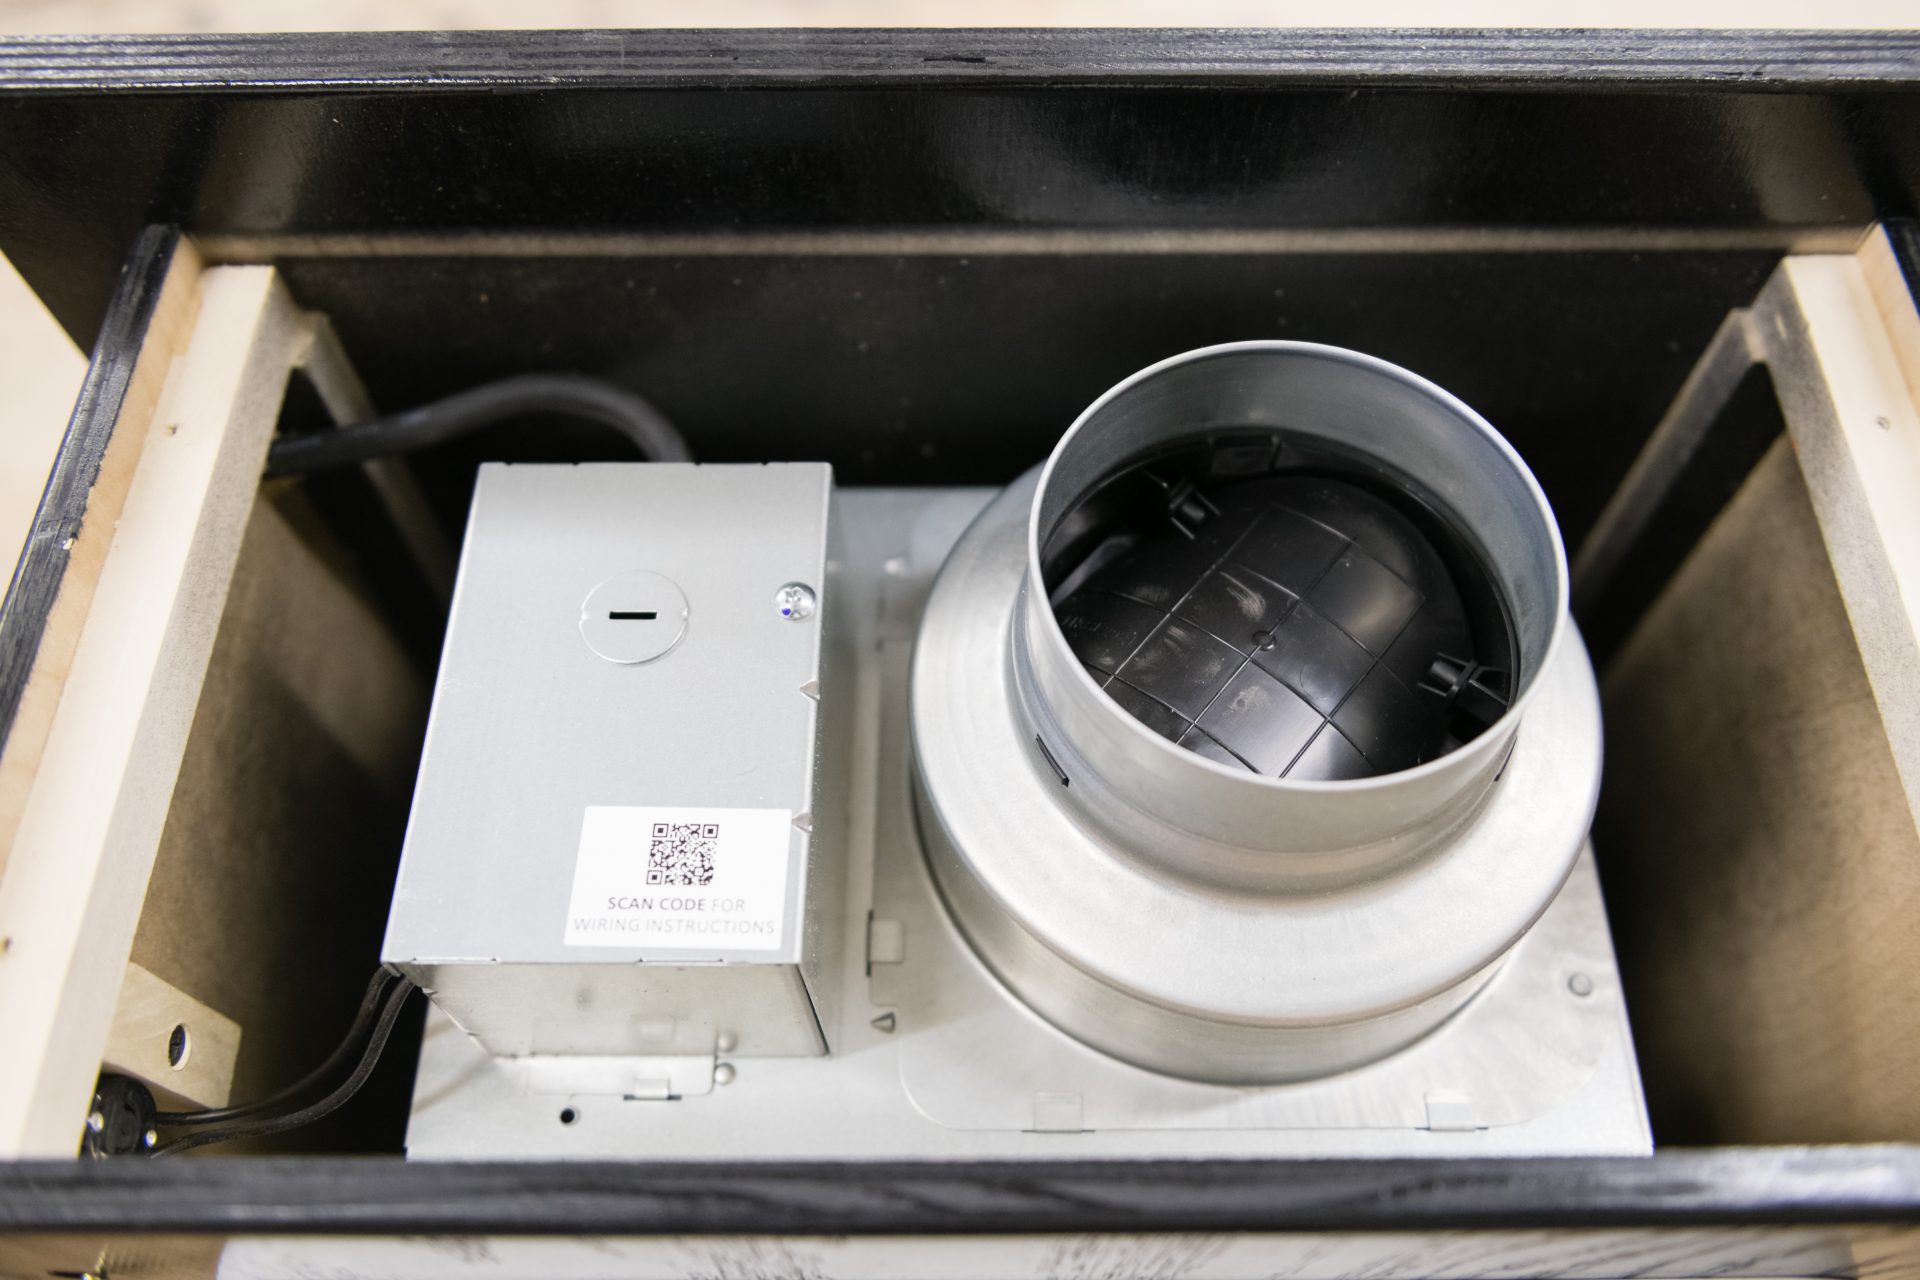
The dual shutter vents were going to be crucial in assisting to maintain the cool air outside throughout the winter months. I did a great deal of research on exhaust fans and picked one with built-in shutters. I acquired a 14" diameter follower capable of 800 CFM. No electrical wiring was required with this specific design because it just connects into an electrical outlet.
For the outside wall surface, I went a 14" light weight aluminum shutter air vent (Pacoima Garage Exhaust Fan). With the equipment identified, I looked for an excellent place for the vent. The very best area would have been above one of the garage doors, but also for visual appeals, I really did not desire the air vent to be visible from the road
It would be practically unseen however still serve its objective. Here's the location I chose inside for the garage exhaust follower: Right here's where the vent would exhaust outdoors: Above, you'll see the initial layer I went through was the drywall. I had 2 layers of insulating foam. Next was the white plastic exterior siding.
The intermediary obtained a little harsh at some of the sides, yet it was not a large bargain. The follower would certainly cover all the sides, and hide any type of abnormalities in my cut. Next off, I had to seal the leading and bottom edges of the opening. This was a required action to avoid the fan from venting air into the wall.
Exhaust Fan Repairs Near Me Pacoima, CA

I couldn't just cut a hole in the siding, put the vent, and call it a day. To maintain water from passing through the exterior siding, I needed to make use of J network. This would certainly permit me to produce a framework around the vent that would overlap the house siding and secure the rough-cut sides from water.
I followed some fantastic instructions on (under the section "Install J-channel around the window"). Here's a picture revealing the assembled J network pieces twisting around the vent: Now came the fun job of working with the house siding. To appropriately mount the outside vent, I needed accessibility to the wall below the house siding, which meant removing numerous pieces of home siding.
, I was able to conveniently separate some home siding, and draw it away from the wall surface. With enough of the house siding out of the way, I was able to continue job on the hole.
Commercial Ventilation Services Pacoima, CA
Next, I put the shutter vent and nailed it in the wall surface studs. Here's an image showing some progress: With the garage vent in location, I connected the J network framework, overlapping the harsh cut sides of the plastic siding.
I put the exhaust fan in the hole and was obtaining ready to screw it into the studs. I made a decision to examine the vents on the follower to make sure they opened up and shut properly.
After some fiddling, I discovered that the opening I cut was also tight of a fit for the fan frame. It was misshaping the framework ever before so slightly to trigger the shutters to not shut correctly. If I pulled the follower regarding 2 inches of the wall surface, the shutters functioned penalty.
I would developed a 24 wooden frame in between the wall surface and the fan, to give the exhaust follower enough range from the hole for the shutters to operate properly. I essentially invested only 10 mins on this job I sliced some 2x4s to size with the miter saw. I affixed them to each other with pocket hole screws to create a frame.
Industrial Exhaust Ventilation Systems Pacoima, CA
Below's an image of the garage wall surface exhaust follower structure (the pocket openings are concealed on the other side): At last, the exhaust follower could be bolted to the wall surface. I pushed the fan against the 24 frame and made sure the shutters opened up and closed openly. I connected the follower to the 2x4s with some durable screws.
I stood back, appreciated my creation and afterwards fired up the exhaust fan with my cordless switch. As the follower rate enhanced to full, both the inside and outdoors shutters available to exhaust the garage. The follower was not that loud either (it was barely distinct outside the garage). Below's a picture of the mounted garage wall surface exhaust follower (powered on) from the inside: Here's an image of the beyond the garage wall surface exhaust fan, showing the vents open with the fan on: I'm extremely excited regarding our brand-new garage exhaust fan.
We had a moderate snow shower (regarding 4 inches), and so I broke out the snowblower to attempt it out. As forecasted, when I ended up removing the snow from the driveway and place away the snowblower in the garage, the still-warm engine started to have an odor up the garage. I engaged the new exhaust fan for a couple of hours, and the garage was back to regular.
The total expense of placing the air vent follower in the garage was around $150 and was collectively concerning a day's well worth of work. If you need exhaust followers in the garage, this tutorial will have your new garage wall exhaust follower up and running in no time at all! I was really happy with the garage vent fan.
Commercial Ventilation Services Pacoima, CA
Nevertheless, I did add another point to our garage air vent follower. I had been by hand transforming the fan on and off as needed. Often I left it running longer than I expected. I desired a much better system of turning the fan off. I wound up buying an digital timer button and plugged the fan into it.
Obviously you want to ensure that the method the fan is switched on is convenient to you. Would you desire to have even more than one button? Probably a motion detector controller would certainly be even better? Now is the time to select. you have to have a supply of "comprise air".

It might be worth it to run a duct simply to force the air to stream across. If you want to obtain fancy, you might integrate some degreee of filtering. This is outside the extent of your concern however I always such as to make certain a job location is well lighted with a lot of lumens and as little glare as feasible.
An exhaust fan's capability is the amount of air it can relocate, which is determined in cubic feet per minute (CFM).
Commercial Ventilation Services Pacoima, CA
Are you thinking of a do it yourself garage exhaust follower installment yet uncertain if it's truly needed? Allow's damage down the advantages and assist you make a decision if it's the appropriate relocation for you. An excellent garage exhaust follower can do a lot more than maintain points trendy. Right here are several of the key advantages: Exhaust followers get rid of contaminants, fumes, and odors that can collect in your garage.
You may require to increase the capacity if you run a store that creates lots of fumes or dirt. You have actually obtained a couple of options when it comes to the kind of fan: These are typical and relatively easy to install. They go on your garage wall surface and eliminate the air via the exterior wall.
Industrial Exhaust Fan Installation Near Me Pacoima, CA
Now for the fun partinstalling the fan! It's not rocket scientific research but requires some standard do it yourself abilities. Right here's a general overview of the procedure: Before starting, guarantee you have the right devices and products. You'll need points like: Security glasses and handwear covers The exhaust fan itself A determining tape Cord connectors Wire cutters Screwdrivers A pencil Screws Jigsaw A drill Safety and security initially, folks! Before you start tinkering power, shut off the power to the circuit you'll be functioning on.
Do you desire it on the wall or the garage ceiling? When you've picked your place, you have to cut a hole in the wall surface or ceiling.
Drill pilot openings in the edges of your marked location, and after that cut meticulously utilizing a jigsaw. Now, it's time to connect the follower to the electrical circuitry. The complying with photo reveals an example circuitry layout for an exhaust follower and light managed by a button and timer. Things right here can obtain a little challenging, so if you're not comfy working with electrical energy, you may intend to call in a professional.
Instant Air Solutions
Address: 412 W Dryden St Apt 6 Glendale, CA 91202Phone: (747) 307-6363
Email: instantairsolutionsinc@gmail.com
Instant Air Solutions
After installing the follower, seal any kind of voids around the real estate with caulk or weatherstripping. Doing so prevents air leaks and keeps out insects, ensuring your follower operates successfully. Next off, transform the power back on and test the follower. Inspect fan speed and guarantee air moves out of your garage, not in.
Garage Exhaust System Pacoima, CAGarage Ventilation Fan Installation Pacoima, CA
Garage Exhaust Vent Pacoima, CA
Garage Ventilation Installers Near Me Pacoima, CA
Garage Air Filtration System Pacoima, CA
Finding A Local Seo Marketing Company Pacoima, CA
Near Me Seo Optimization Pacoima, CA
Garage Exhaust Fan Pacoima, CA
Instant Air Solutions
Table of Contents
- – Exhaust Fan Installation Near Me Pacoima, CA
- – Instant Air Solutions
- – Commercial Exhaust Fan Installation Pacoima, CA
- – Garage Air Filtration System Pacoima, CA
- – Exhaust Fan Repairs Near Me Pacoima, CA
- – Commercial Ventilation Services Pacoima, CA
- – Industrial Exhaust Ventilation Systems Pacoi...
- – Commercial Ventilation Services Pacoima, CA
- – Commercial Ventilation Services Pacoima, CA
- – Industrial Exhaust Fan Installation Near Me ...
- – Instant Air Solutions
Latest Posts
Brea Payroll Services For Small Businesses
La Crescenta Swamp Cooler Repair Company
Los Angeles Furnace Replacement
More
Latest Posts
Brea Payroll Services For Small Businesses
La Crescenta Swamp Cooler Repair Company
Los Angeles Furnace Replacement