All Categories
Featured
Table of Contents
- – Painting Rv La Habra, CA
- – OCRV Center
- – Motorhome Paint Shops La Habra, CA
- – Motorhome Custom Paint Jobs La Habra, CA
- – Rv Paint Shops Near Me La Habra, CA
- – Paint Rv La Habra, CA
- – Paint Fiberglass Rv La Habra, CA
- – Paint Fiberglass Rv La Habra, CA
- – Class A Rv Custom Paint And Repair La Habra, CA
- – Painting Rv La Habra, CA
- – Class A Rv Custom Paint And Repair La Habra, CA
- – Painting Rv Exterior La Habra, CA
- – Motorhome Painting La Habra, CA
- – Rv Painting La Habra, CA
- – Custom Rv Paint Jobs La Habra, CA
- – Paint Motorhome Exterior La Habra, CA
- – OCRV Center
Painting Rv La Habra, CA
What a transformation!!! We had an extremely rough 20 year old van. We debated trading her in, but I'm so glad we made a decision to paint it rather. The entire team was truly terrific. You can inform everybody loves what they do, and they are really efficient it also. We were thrilled by the entire process - resolving her several scratches and dents, the great layout, the weekly progression pictures, and the ended up outcomes! Currently we have something special that is distinctly ours - and has every one of our memories from our trips also! Truthfully can't claim enough advantages regarding our experience with CDI.
This visual image is a representation of what your train will certainly look like with the design and colors you have actually chosen. Be sure to see our visuals design page to attract ideas for your own customized paint work. You'll find a slide show of a number of past paint design makings we've done on devices including fifth wheels, Class C, Class A and more!.
After careful consideration, Family Motor home Association will be pausing the Online forums reliable. One of the major difficulties is that the online forum software application we've counted on for over a decade is no much longer compatible with existing systems without considerable redevelopment.
Motorhome Paint Shops La Habra, CA
It's clear that participants are currently connecting and sharing experiences on newer systems that better match modern-day expectations and lifestyles. Stopping the discussion forums gives us the opportunity to re-evaluate just how we can offer an extra contemporary, easily accessible, and interesting area for our participants to attach. We're exceptionally thankful to those of you that have contributed to the online forums throughout the years.
I recognize I'm going to obtain some flack for this and some individuals are mosting likely to tremble their heads and raise some brows. I don't follow the rules for auto-body painting and perhaps not even for camper painting. Below's why, That's right. I do not spray it, I do not make use of automobile paint.
Motorhome Custom Paint Jobs La Habra, CA
In some cases I do not also eliminate the decals (wheeze!). Is it excellent? No. Is it way much better than before? Yes. Am I embarrassed to be seen with it after it has been painted? No. Was I previously fretted about being mistaken for a mobile meth laboratory? Yes. Am I fretted about it currently? No.
I constantly examine a job before diving in and making use of any one approach. I will certainly constantly inspect the decals and attempt to eliminate them. If you would certainly such as to try to get rid of the stickers, you will wish to attempt the complying with materials: The appropriate method to paint a RV outside entails eliminating stickers, power cleaning, taping and covering home windows and after that splashing on an auto grade paint with a paint sprayer.
Rv Paint Shops Near Me La Habra, CA
If you have actually been transformed away at specific camping areas based upon your RV's look, you need to paint. Painting Rv Exterior La Habra. Here is what I do to prep the surface area before paint: Lightly sand areas where the stickers are gurgling or peeling off up Power laundry everything, including the roofing Enable to dry thoroughly Seal up edges and around all windows with a paintable caulk
I assume eliminating stickers from a smooth-sided trailer is easier. I will certainly always evaluate decals and effort to eliminate them, but if they look like they aren't going anywhere and the camper is even more than 20 years old, I will likely just paint over them.
Paint Rv La Habra, CA
Our much older recreational vehicle with smooth sides is holding well. The newer trailer with bumpy sides started to raise a little and I needed to retouch the paint. I believe more recent stickers might eventually bubble and lift, however if your recreational vehicle is older than 20 years, they sit tight.
I constantly advise making use of an excellent gripping guide initially, because it's difficult to anticipate exactly how well paint will certainly stick to different surface areas. If you are painting right over an aluminum-sided trailer, you will desire to make use of a primer that is suggested for direct-to-metal application. Painting Rv Exterior La Habra. With that said claimed, I have actually had quite good success with Behr Marquee outside paint and primer in one

It has almost always been covered in one layer and held up well. I used a reduced radiance shine (eggshell) on the exterior of our 50's classic trailer because there were a lot of dents and imperfections in the siding and I wanted a coating that would certainly camouflage them better. The downside to this is that dirt does not glide off or wipe as good as a high gloss.
I was unwilling to paint over the stickers on our existing RV with a semi-gloss paint, yet I desired to see if a semi-gloss would show up much more expert. Clutching Primer Latex Paint 3/8 snooze roller (you might additionally make use of 1/4 snooze or a foam roller for a smoother finish) Tilted brush * I experimented with an oil based paint when and it split and flaked off!
Paint Fiberglass Rv La Habra, CA
In the end, I just went for it and never looked back! Why did I select to roll the paint instead of splashing it?
Due to the fact that of painting over the decals, I have actually constantly figured the roller will generate a slightly textured coating that will hide the decals. As soon as the paint has dried and treated, I included fun plastic stickers!
Paint Fiberglass Rv La Habra, CA
I also got a fun vanity plate for the front of the camper. I likewise painted the door pink! I am always asked exactly how well this approach stands up. In my experience, you may have little places that require retouching after a period of travel, however generally it holds well.
These high web traffic locations take fairly a beating, but however, I have only ever before seen light chipping happen over time. Generally, I feel that the enhancement I obtain from painting and ease of this approach are worth a couple of little chips here and there. I always maintain paint available for repair.
Our group of Motor home paint and body professionals is right here to help. Whether you require a, professional,, or small touch-ups, we have actually obtained you covered at our RV paint and body shop in Everett, Washington.
Look into our previous motorhome paint and body tasks, and set up an appointment with us today to! At our store, we offer and fix solutions for both mechanized and towable coaches, consisting of and repair services. It is essential to note that in some motorhomes, the windscreen should be resealed every few years to preserve a watertight gasket.
Class A Rv Custom Paint And Repair La Habra, CA
I wax it when a year with a high quality wax and when I wash it I NEVER dry it ... just air dry. To do that you'll need a deionizer, well worth it as it reduces down the time substantially. As others have stated, it simply looks sharp. And who knows, when it's time to market, it could be a lot more enticing than a non repainted one? Although I doubt I'll get my full money back in the FBP choice.
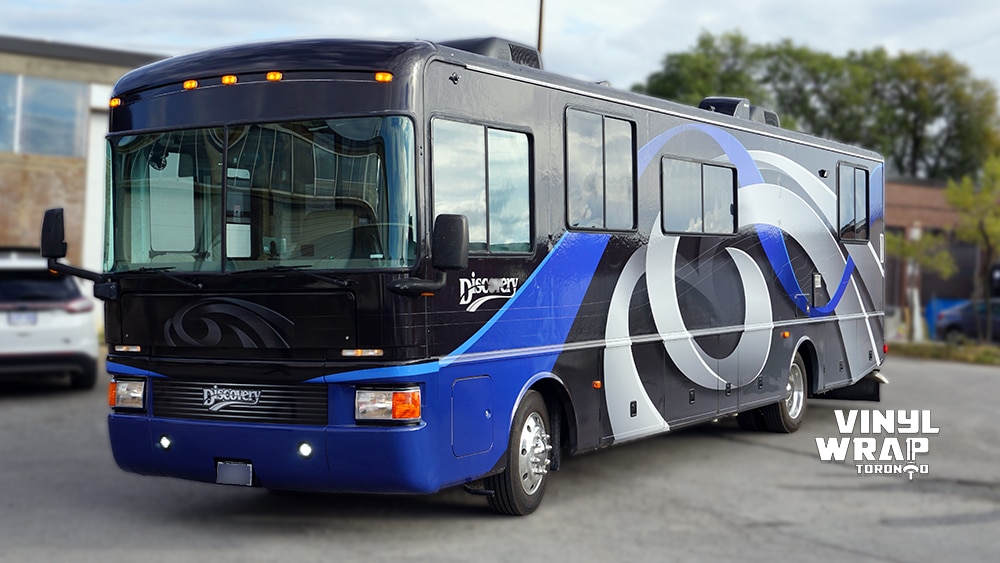
When it concerns personalizing your motorhome, one of the largest decisions you'll encounter is whether to cover or repaint your RV. Both choices can offer your automobile a fresh, individualized lookbut they come with extremely different costs, processes, and lasting effects. For numerous motor home proprietors, paint may appear like the traditional path, yet it commonly features a large cost and long-term results.

In this post, we'll contrast plastic wrapping vs. painting a motorhome, damaging down the essential distinctions in expense, resilience, upkeep, and style. If you're on the fence about which option is best for your RV, this guide will certainly assist you make a positive choice. Vinyl covering involves using a large sticky movie straight over the RV's outside.
Painting Rv La Habra, CA
Repainting a motor home can take numerous weeks, particularly when factoring in sanding, priming, and drying out times. A vinyl cover, by contrast, can be finished in simply a couple of days, enabling you to obtain back when traveling faster. Covered Recreational vehicles need much less effort to keep clean. There's no demand for waxing or polishing, just wash it with light soap and water.
These are significantly preferred for individual Recreational vehicles because of their streamlined, underrated design. Include a premium or futuristic edge to your motorhome with metal or chrome-effect plastic. Offered in silver, gold, copper, and even color-shifting choices, these wraps are excellent for those that wish to attract attention. Textured plastic wraps mimic the look of genuine products while including deepness and tactile charm.
Perfect for: Service branding and mobile advertising and marketing Themed Recreational vehicles for events or festivals Individualized art work or family names Love the outdoors? Nature-themed wraps can include mountains, woodlands, oceans, or deserts, excellent for journey candidates that want their motorhome to reflect their lifestyle and travel locations. You do not need to cover the entire RV to make a statement.
It protects your paint and can be eliminated cleanly if applied effectively. The surface area has to be smooth and tidy for appropriate bond.
Class A Rv Custom Paint And Repair La Habra, CA
And also, we share top item suggestions so your camper appears looking fresh. Over the years, we have actually successfully refurbished two traveling trailers leading to bottom and consisting of the exteriors. To provide both rigs a fresh face-lift, this is the outside paint technique that we recommend. Wish to check out both remodellings? Below is the 2007 Keystone Hornet and the 2005 Keystone Hornet.
Be certain to get rid of all stickers from areas that you intend to repaint. Never ever paint over stickers. Make use of a warmth weapon to warm the decal so that you can pull off the vinyl by hand.
Painting Rv Exterior La Habra, CA
Use the concealing paper to block off bigger areas from the overspray. 4 After you've taped off the areas you desire to repaint, sand down all areas of the camper that you prepare to repaint.
5 Next, wipe down the motor home's exterior with acetone and a microfiber towel to remove any kind of oily deposit that might stop excellent adhesion. Dirt from sanding will spoil the paint structure. Wipe the location down once again with a damp microfiber cloth to make sure there is no dirt. 6 Using a paint sprayer, use one layer of primer.
Motorhome Painting La Habra, CA
If the paint looks uneven after drying out, mess up the surface once more and use an additional coat of paint. Relying on the problem that your RV's exterior was in and just how well you performed in your preparation, you may require 2-3 layers of paint for a strong, smooth surface. 10 After the second (or third) coat of paint is completely dry, use a clear topcoat.
This site makes use of cookies to aid personalise material, tailor your experience and to keep you logged in if you register. By proceeding to use this website, you are granting our use of cookies.
Learn more about the recent uptick in van customizations, paint modifications, body repair services, and center upgrades required to meet the higher demand for RV painting services. For more information about CDI Custom Paint check them out right here They have some excellent instances of before and after images of work they have actually done along with videos.
Discover how you can easily locate Tidy Storage tank supplier solutions and take advantage of the broadening dealer network. The segment better identifies the prevalence of specialist storage tank cleansing services over open market options, emphasizing a specialized process that prevents waste buildup in holding tanks. The podcast touches on the harmony between a cleansing solution company and the FMCA, providing unique discount rates for FMCA members.
Rv Painting La Habra, CA
Have an inquiry for us? Desire to request a specific visitor on the show?
We are still in the Madison, Wi. camping site at the FMCA rally. We spoke to folks from Mike's Personalized Paint in Bremen, In. Regarding doing an overall repaint of our 1999 DSDP.From what they stated, and what you can see on their internet site, I have little doubt they would do a first rate job.
Top quality of products and workmanship are what I'm searching for. If you have remarks you prefer to not post on the online forum, please send them to me at:! Bob.
Known as chameleon paint, this paint job changes in color depending on the checking out angle and light source. It requires a three-stage paint process. To attain this design, we stencil in or hand-draw a fire over the top of a thin, also base layer. The flame is then colored in with different shades to add dimension.
Custom Rv Paint Jobs La Habra, CA
Look up in the proprietor's guidebook for suggestions on the TSP you can use to eliminate all the dirt and crud. Once this is done, make use of the hand-masker dispenser to cover up all areas that you intend not to repaint on.
If you intend to replace the flooring, you can allow it be. 4. Obtain the guide now and start applying it on the motorhome's interior surfaces. Utilize a good-quality product for an extensive and professional surface. Normally, latex-based guides function better on camper walls as compared to oil-based primers, which are excellent for the concrete walls of homes.
Paint Motorhome Exterior La Habra, CA
As soon as the primer is dry, now is the time to paint. Pick a paint type as per the support of the camper's OEM and slim down your listing of favorite shades.
OCRV Center
Address: 23281 La Palma Ave Yorba Linda, CA 92887Phone: (714) 909-1444
Email: art@ocrvcenter.com
OCRV Center
Wait for a coat to dry correctly prior to you use the second one. For painting the ceilings and closets, you can make usage of the sprayer.
Custom Rv Paint Jobs La Habra, CACustom Rv Paint Jobs La Habra, CA
Painting Rv Walls La Habra, CA
Motorhome Custom Paint La Habra, CA
Rv Paint La Habra, CA
Rv Paint Shops Near Me La Habra, CA
Rv Painter La Habra, CA
Paint Rv La Habra, CA
Custom Rv Paint La Habra, CA
Motorhome Paint Repair La Habra, CA
Rv Painting La Habra, CA
Rv Paint Shop Near Me La Habra, CA
Painting Rv Walls La Habra, CA
Motorhome Custom Paint Jobs La Habra, CA
Rv Paint Job La Habra, CA
Rv Paint Repair La Habra, CA
Painting Fiberglass Motorhome La Habra, CA
Custom Motorhome Paint Jobs La Habra, CA
Motorhome Custom Paint Jobs La Habra, CA
Motorhome Paint Repair La Habra, CA
Custom Painted Motorhomes La Habra, CA
Rv Painting La Habra, CA
Paint Fiberglass Rv La Habra, CA
Motorhome Paint Shops La Habra, CA
Custom Rv Paint Jobs La Habra, CA
Motorhome Painting Near Me La Habra, CA
Motorhome Paint Repair La Habra, CA
Motorhome Custom Paint La Habra, CA
Rv Paint And Repair La Habra, CA
Custom Painted Motorhomes La Habra, CA
Rv Paint Repair La Habra, CA
Custom Painted Motorhomes La Habra, CA
Custom Rv Paint La Habra, CA
Rv Paint Shops Near Me La Habra, CA
Rv Painting La Habra, CA
Class A Rv Custom Paint And Repair La Habra, CA
Custom Rv Paint Jobs La Habra, CA
Painting Rv Exterior La Habra, CA
Rv Paint And Body Shops Near Me La Habra, CA
Rv Paint And Repair La Habra, CA
Rv Painting Near Me La Habra, CA
Rv Painter La Habra, CA
Painting Rv La Habra, CA
Motorhome Painting Near Me La Habra, CA
Painting Fiberglass Motorhome La Habra, CA
Paint Fiberglass Rv La Habra, CA
Custom Rv Paint Jobs La Habra, CA
Rv Painting Near Me La Habra, CA
Paint Motorhome Exterior La Habra, CA
Motorhome Custom Paint Jobs La Habra, CA
Rv Paint Repair La Habra, CA
Motorhome Custom Paint La Habra, CA
Rv Paint And Body Shops Near Me La Habra, CA
Rv Paint Shop Near Me La Habra, CA
Class A Rv Custom Paint And Repair La Habra, CA
Rv Exterior Paint La Habra, CA
Rv Painting Near Me La Habra, CA
Rv Painter La Habra, CA
Rv Paint Shop Near Me La Habra, CA
Rv Paint La Habra, CA
Rv Painting Near Me La Habra, CA
Motorhome Painting La Habra, CA
Painting Fiberglass Motorhome La Habra, CA
Rv Paint Repair La Habra, CA
Rv Paint And Body Shops Near Me La Habra, CA
Painting Rv La Habra, CA
Paint Motorhome Exterior La Habra, CA
Motorhome Paint Repair La Habra, CA
Custom Motorhome Paint Jobs La Habra, CA
Class A Rv Custom Paint And Repair La Habra, CA
Painting An Rv La Habra, CA
Motorhome Paint Repair La Habra, CA
Painting Rv Exterior La Habra, CA
Rv Paint Shops Near Me La Habra, CA
Painting An Rv La Habra, CA
Motorhome Custom Paint Jobs La Habra, CA
Rv Paint Repair La Habra, CA
Rv Painting Near Me La Habra, CA
Near Me Seo Solutions La Habra, CA
Close By Seo Optimization La Habra, CA
OCRV Center
Table of Contents
- – Painting Rv La Habra, CA
- – OCRV Center
- – Motorhome Paint Shops La Habra, CA
- – Motorhome Custom Paint Jobs La Habra, CA
- – Rv Paint Shops Near Me La Habra, CA
- – Paint Rv La Habra, CA
- – Paint Fiberglass Rv La Habra, CA
- – Paint Fiberglass Rv La Habra, CA
- – Class A Rv Custom Paint And Repair La Habra, CA
- – Painting Rv La Habra, CA
- – Class A Rv Custom Paint And Repair La Habra, CA
- – Painting Rv Exterior La Habra, CA
- – Motorhome Painting La Habra, CA
- – Rv Painting La Habra, CA
- – Custom Rv Paint Jobs La Habra, CA
- – Paint Motorhome Exterior La Habra, CA
- – OCRV Center
Latest Posts
Best Health Insurance Plans For Individuals La Habra
Payroll Services Placentia
Swamp Cooler Replacement Beverly Hills
More
Latest Posts
Best Health Insurance Plans For Individuals La Habra
Payroll Services Placentia
Swamp Cooler Replacement Beverly Hills