All Categories
Featured
Table of Contents
- – Rubber Roofing For Campers Orange, CA
- – OCRV Center
- – Rv Roof Leak Repair Orange, CA
- – Rv Roof Repair Fiberglass Orange, CA
- – Rv Trailer Roof Repair Orange, CA
- – Rv Roof Maintenance Orange, CA
- – Rv Trailer Roof Repair Orange, CA
- – Rv Roof Repair Service Near Me Orange, CA
- – Rv Fiberglass Roof Repair Orange, CA
- – Resealing Rv Roof Orange, CA
- – Roof Repair For Rv Orange, CA
- – Rv Rubber Roof Repair Orange, CA
- – Rv Roof Leak Repair Orange, CA
- – Replace Rv Roof Orange, CA
- – Class C Rv Roof Repair Orange, CA
- – OCRV Center
Rubber Roofing For Campers Orange, CA
Depending upon the state of the roof covering's rips and cracks, you might need to finish a patch fixing or replace the whole roof. Pooled water and color encourage the development of mold and mildew and mildew, which can be difficult to clean up from a RV roofing system. RV roofs can oxidize over the years.
RV roofing systems with inadequate water drainage have low areas that accumulate water from cleaning or rains. Deterioration can develop roof covering quality issues that prevent coverings from sticking to the roof.
Rv Roof Leak Repair Orange, CA
Executing recreational vehicle roofing maintenance on a regular basis provides numerous benefits: Though regular upkeep requires you to spend time and cash into cleaning and repairing your roofing system, you will save a lot more in the future. Maintenance aids your RV last longer by fixing small issues before they end up being significant problems. All sorts of climate can cause damage on your roofing.
A well-maintained Motor home is typically extra useful than one with a leaky roofing system. You will certainly need these devices and products: Roofing system sealant shields the roof of your RV from harmful UV rays.
Recreational vehicles that have a built-in ladder generally have a walkable roofing system. Comply with the Recreational vehicle maker's guidelines for the roof's weight restrictions. Furthermore, beware not to tip on the roof covering cross competes and expect obstacles when on the motor home roofing for your security. Debris, dirt and dirt that collect on your RV's roof covering, combined with warmth and moisture, can encourage mold growth.
Rv Roof Repair Fiberglass Orange, CA
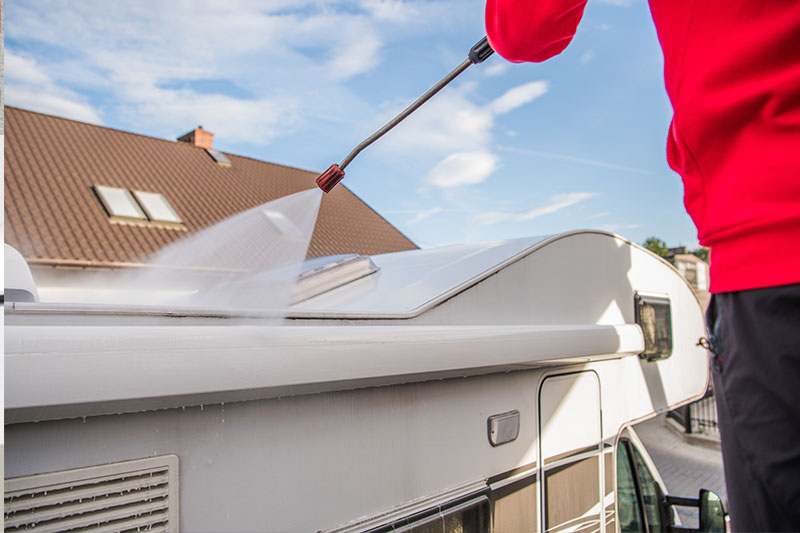
Cleansing your motor home roofing system several times a year removes the particles and avoids mildew from holding and creating more damages. Adhere to these steps to cleanse your motor home's roofing: Move particles off the roofing system, specifically in the areas around the roofing system fixtures. Make use of a tube and water to rinse the roofing.
Rub the roofing with a brush, relocating in circular activities. If required, include even more cleaner and scrub till the roofing is clean.
This product has a moderate unpleasant to remove the oxidation and can be rubbed until it shines. A UV sealer or wax protects the motor home roof covering from UV rays, as direct exposure to the sun can make the roof covering product split and leakage. This sealant also makes the roofing shiny and protects against black streaks from creating on the wall surfaces.
Rv Trailer Roof Repair Orange, CA
Some Recreational vehicle insurance policies expect a roofing system replacement every 10 to 15 years. EternaBond tape is one technique for RV roof repair service.
This experience with camping prolongs to caring for a Recreational vehicle. KOA's helpful staff are trained and knowledgeable in Motor home upkeep finest methods, from the roof to the tires.
Started in Billings, MT in 1962, KOA's family of campground brands KOA Trip, KOA Vacation and KOA Hotel today offer even more than a million camping family members annually. KOA is devoted to "attaching individuals to the outdoors and each various other" by providing individuals with a variety of outdoor camping experiences and the info they require to make the most of their camping trip.
There are many factors you should consistently recoat your RV roof covering, sealing it against not simply water damage, but sunlight, wind, and deterioration. Like any type of sort of electric motor automobile, motor home roofings are built to endure challenging weather, from snow to hail to a deluge. The roofing material can still wear out over time.
Rv Roof Maintenance Orange, CA
When you utilize Fluid Rubber Sealant items, be sure to thoroughly adhere to the application instructions. These will suggest how long the item takes to treat so that you can set up the application around weather condition patterns where you live. You need to inspect your RV roofing et cetera of the vehicle every 6 months to catch tiny problems prior to they end up being big, pricey ones.
About every two to four years is suitable, depending on the kind of weather you have and the type of environment you drive via on a regular basis. Certain type of climates can trigger more deterioration on the roof covering than others. And constantly, after a big storm or heavy snow, evaluate the roofing for damages.
While some signs that your recreational vehicle roof covering is harmed or has a leak are evident, such as water streaming in during a rainstorm, other indicators of damages might not be as readily obvious. Comprehending what to seek can make your assessments a lot more efficient and bring your attention to issues when they're tiny enough to be a relatively quick and inexpensive repair.
And, when you use Liquid Rubber Sealcoat products, you know that you're using the most effective products with the best credibility. Rv Trailer Roof Repair Orange.
Rv Trailer Roof Repair Orange, CA
The idea of replacing your recreational vehicle's roof covering could be at the top of your prospective RVing problems. The entire process can be complicated, pricey, and time consuming. However, if you enter knowing what to expect, it will be much less stressful, and you'll finish up with a glossy new roofing system providing assurance out when traveling.
Fortunately, my Motor home roof replacement went easier than I prepared for. How do you recognize if your roof needs to be changed?
Rv Roof Repair Service Near Me Orange, CA
Interior damages is a possible indicator. Rv Trailer Roof Repair Orange. If you locate any type of indoor damage, the next step is to identify the source of the leakage.
This is when the damages was discovered. If you have damages to your recreational vehicle roofing, a specialist must determine whether you're far better off fixing or replacing the roof. Repairs are less pricey ahead of time but may influence the resale value of your gear. Roofing substitutes are costly yet offer both value and peace of mind.
If another person has actually collapsed into your RV, their insurance policy could possibly cover the replacement. If your guarantee or insurance doesn't cover your roofing system replacement, you will require to pay for it expense. If a service warranty or insurance coverage covers the expense, you'll only need to pay the amount of your insurance deductible.
This relates to various other circumstances where damages takes place, normally while the RV isn't in operation, such as tornado damage. Your future insurance prices may not rise if you're located not to be responsible. Unless you're incredibly useful, you'll likely require to locate a professional to change your RV roofing system.
Rv Fiberglass Roof Repair Orange, CA
After discovering a fixing store, we dropped off our travel trailer for an initial inspection. In this case, the insurance coverage really did not send an adjuster out for an in-person assessment, but some business require you to have an adjuster appearance at your RV roof to verify the damage.
From there, the roofing service technician just offered one kind of roofing system, so we really did not have any type of decisions to make. In some circumstances, you might have various roofing options to consider, with each offering distinct pros and cons. When the insurance policy was authorized, the professional reached function. It may take several weeks or months to obtain your RV's roofing changed.
Resealing Rv Roof Orange, CA
After a couple of short weeks, our roofing substitute was total. A full RV roofing system replacement typically costs a number of thousand dollars.
If you don't check, reseal, and repair your motor home roof routinely, you will certainly wind up with some lovely awful water damages. This is something that will promptly lower the worth of your recreational vehicle and could also render it unusable. Taking treatment of your RV roofing system is something you can probably do all on your own.
After about 10 years, it will additionally be needed to reseal the whole roofing system. To do this, you'll require to climb onto the roof, however be really careful when you do. Are you sure it's strong enough to sustain you? Exists a ladder at the back? If not, it probably isn't solid sufficient to be walked on.
Roof Repair For Rv Orange, CA
Next, you'll desire to cleanse your roofing system thoroughly, so as to remove any type of dust bits. You can utilize a lengthy dealt with brush for this, but never utilize a cleaner that contains oil solvents or citrus components on your rubber or vinyl roof. These sorts of cleaners will certainly create irreversible damages to the surface.
While you're cleaning, remove any debris or old roofing system product, but beware while you do this as you can conveniently elongate a tear, or perhaps punch a hole through the roof. You should then dry the roof covering as best as you can. Keep In Mind: Rubber recreational vehicle roofings can be very slippery when damp.
After the roof covering is clean, you are going to wish to examine the seams for openings, splits or peeling off, so you can reseal wherever required. You'll desire to make a point of resealing all seams as soon as a year whether or not they reveal indications of wear.
Rv Rubber Roof Repair Orange, CA
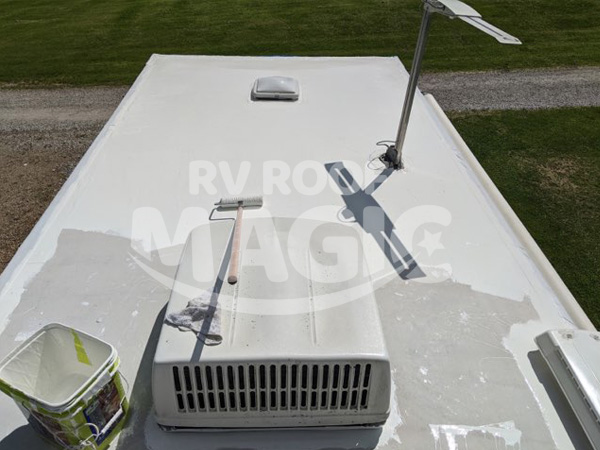
When it concerns picking the ideal motor home roof covering sealer, you'll intend to think about whether you are repairing a tear, resealing a joint, or securing the whole roofing. The kind of roof covering is additionally essential to bear in mind, as RV roofings can be made from either EPDM (Ethylene Propylene Diene Monomer) and TPO (Thermal Polyolefin) and you need the product you use to be compatible with your roof type.
Dicor Self-Leveling Lap Sealer is a great option for reviewing old roof seals. It can be made use of for area sealing or to reseal every seam on the RV roof covering. Just clean up the area well and apply with a caulk gun. Right stuff will certainly level itself out, so do not fret regarding that component.
Rv Roof Leak Repair Orange, CA
Comparable to the EPDM system detailed above, this covering item will cover your TPO roofing and help it last an additional 10 years. Prior To EPDM and TPO, steel was the product of choice for Recreational vehicle roofing systems.
The aforementioned EternaBond is still king when it involves repairing little problems on a steel roofing. It likewise works well for sealing seams. Recreational vehicle metal roofs do require to be absolutely resealed once in a while. Family roof covering layers will secure a metal roof just great, however the very best product by much, for metal roof coverings, is Dicor Steel Motor Home Roofing System Coating.
Make certain to reseal whenever required and challenge resealing all of the seams as soon as every year or so. Dicor Self-Leveling Lap Sealant works well for this job also. If your fiberglass roofing system requires to be coated, Dicor Fiberglass Roofing Coating is an excellent pick. You'll require to get rid of the present roof covering.
Replace Rv Roof Orange, CA
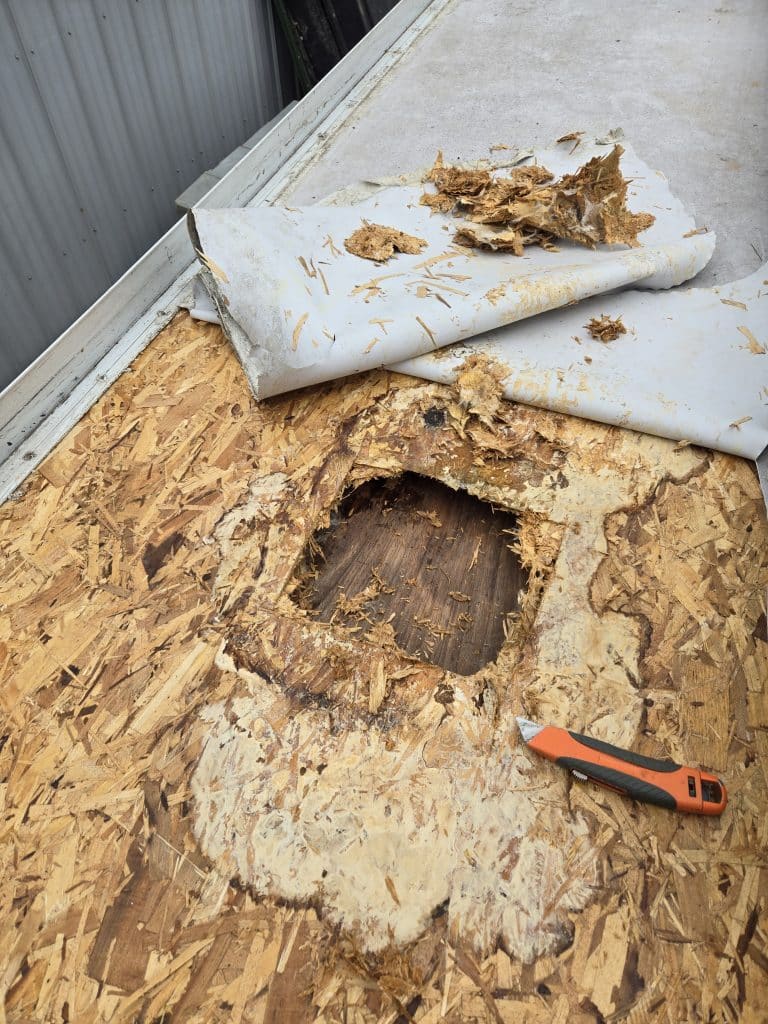
Eliminate the air vent followers, skylights, and air conditioner device. Peel the existing layer of rubber back until you see the plywood structure below. Examine plywood for rot, bowing, mold and mildew, or splintering. Replace damaged pieces. When the plywood is ready, it's best to clean up the plywood with something like mineral spirits to get rid of any type of type of particles.
Do this in little portions all along the roofing system, cutting holes in the rubber roof covering for any kind of function that will go back right into the roof. Replace your roofing's followers, skylights, and AC system.
In this blog post, we desire to show to you how to DIY motor home roofing system fixing. Residing in a motor home has impressive minutes, but things additionally go incorrect. Understanding how to DIY a great deal of things that can break or ruin will save you not only a great deal of money on recreational vehicle repair services yet could also conserve you a great deal of potential time in the shop! This message might include associate web links.
I might obtain a little commission when you make an acquisition using my web link. Read our Please Note Policy for even more information. We try to intend our courses meticulously to stay clear of low-hanging items over the roadway. In some cases, though, we find ourselves in unplanned situations. This is just how we wound up with a few tiny rips on the roof of our motor home.
Class C Rv Roof Repair Orange, CA
We assumed we were free from the branches, yet we wound up capturing a few of them on the far left side of the roof covering. There were a total of 4-5 tiny openings in the side of the roof covering. Initially, we didn't examine the roofing system since we didn't believe we strike anything.
OCRV Center
Address: 23281 La Palma Ave Yorba Linda, CA 92887Phone: (714) 909-1444
Email: art@ocrvcenter.com
OCRV Center
One of the splits in our motor home roof A few weeks later, we withstood a severe thunderstorm and a whole lot of rainfall. Throughout the storm, we found that we had a little amount of water leaking via one of the lights in the bathroom. The good news is, we did not wind up with any type of irreversible water damage.
Resealing Rv Roof Brea, CARv Slide Out Roof Repair Brea, CA
Rv Rubber Roof Replacement Cost Brea, CA
Rv Trailer Roof Repair Brea, CA
Rubber Roof For Camper Brea, CA
Class C Rv Roof Repair Brea, CA
Rv Rubber Roof Replacement Cost Brea, CA
Rubber Roof Installation Brea, CA
Rv Roof Repair Near Me Brea, CA
Class C Rv Roof Repair Brea, CA
Rubber Roof For Camper Brea, CA
Rv Trailer Rubber Roof Repair Brea, CA
Rv Roof Repair Fiberglass Brea, CA
Rv Rubber Roof Repair Brea, CA
Epdm Rv Roof Repair Brea, CA
Rv Trailer Roof Repair Brea, CA
Repair Rv Roof Leak Brea, CA
Resealing Rv Roof Brea, CA
Repair Rv Roof Leak Brea, CA
Rv Roof Repair Fiberglass Brea, CA
Rv Trailer Roof Repair Brea, CA
Rubber Roofing For Campers Brea, CA
Rv Fiberglass Roof Repair Brea, CA
Rv Rubber Roof Replacement Brea, CA
Rv Roof Leak Repair Brea, CA
Rv Roof Repair Service Near Me Brea, CA
Rubber Roof Installation Brea, CA
Rv Roof Leak Repair Near Me Brea, CA
Rv Roof Maintenance Brea, CA
Rv Rubber Roof Maintenance Brea, CA
Epdm Rv Roof Repair Brea, CA
Resealing Rv Roof Brea, CA
Rv Roof Replacement Brea, CA
Rv Trailer Rubber Roof Repair Brea, CA
Class C Rv Roof Repair Brea, CA
Rubber Roofing For Campers Brea, CA
Rubber Roofing For Rv Brea, CA
Rubber Roofing For Rv Brea, CA
Repair Rv Roof Brea, CA
Best Rv Roof Repair Brea, CA
Rv Roof Leak Repair Near Me Brea, CA
Class C Rv Roof Repair Brea, CA
Rv Roof Repair Near Me Brea, CA
Rv Roof Repair Near Me Brea, CA
Repair Rv Roof Leak Brea, CA
Epdm Rv Roof Repair Brea, CA
Resealing Rv Roof Brea, CA
Rv Roof Repair Fiberglass Brea, CA
Rv Rubber Roof Replacement Brea, CA
Repair Rv Roof Leak Brea, CA
Rv Roof Repair Service Near Me Brea, CA
Roof Repair For Rv Brea, CA
Rv Trailer Roof Repair Brea, CA
Rubber Roofing For Campers Brea, CA
Rv Trailer Rubber Roof Repair Brea, CA
Rv Roof Replacement Brea, CA
Rubber Roof For Camper Brea, CA
Rv Trailer Rubber Roof Repair Brea, CA
Rv Roof Leak Repair Brea, CA
Rubber Roofing For Campers Brea, CA
Repair Rv Roof Leak Brea, CA
Rv Roof Repair Brea, CA
Rubber Roofing For Rv Brea, CA
Rv Roof Repair Service Near Me Brea, CA
Rv Roof Leak Repair Brea, CA
Rv Roof Repair Brea, CA
Rv Trailer Roof Repair Brea, CA
Rv Rubber Roof Repair Brea, CA
Rv Rubber Roof Maintenance Brea, CA
Replace Rv Roof Brea, CA
Rv Trailer Rubber Roof Repair Brea, CA
Rv Trailer Rubber Roof Repair Brea, CA
Rv Roof Replacement Brea, CA
Rv Roof Leak Repair Brea, CA
Rv Slide Out Roof Repair Brea, CA
Roof Repair For Rv Brea, CA
Rv Trailer Roof Repair Brea, CA
Rv Roof Repair Near Me Brea, CA
Close By Seo Consultant Brea, CA
Finding A Seo Pricing Brea, CA
OCRV Center
Table of Contents
- – Rubber Roofing For Campers Orange, CA
- – OCRV Center
- – Rv Roof Leak Repair Orange, CA
- – Rv Roof Repair Fiberglass Orange, CA
- – Rv Trailer Roof Repair Orange, CA
- – Rv Roof Maintenance Orange, CA
- – Rv Trailer Roof Repair Orange, CA
- – Rv Roof Repair Service Near Me Orange, CA
- – Rv Fiberglass Roof Repair Orange, CA
- – Resealing Rv Roof Orange, CA
- – Roof Repair For Rv Orange, CA
- – Rv Rubber Roof Repair Orange, CA
- – Rv Roof Leak Repair Orange, CA
- – Replace Rv Roof Orange, CA
- – Class C Rv Roof Repair Orange, CA
- – OCRV Center
Latest Posts
Best Health Insurance Plans For Individuals La Habra
Payroll Services Placentia
Swamp Cooler Replacement Beverly Hills
More
Latest Posts
Best Health Insurance Plans For Individuals La Habra
Payroll Services Placentia
Swamp Cooler Replacement Beverly Hills