All Categories
Featured
Table of Contents
- – Painting An Rv Placentia, CA
- – OCRV Center
- – Motorhome Painting Placentia, CA
- – Paint Rv Placentia, CA
- – Motorhome Paint Repair Placentia, CA
- – Paint Fiberglass Rv Placentia, CA
- – Motorhome Paint Repair Placentia, CA
- – Custom Rv Paint Jobs Placentia, CA
- – Rv Paint And Body Shops Near Me Placentia, CA
- – Rv Painter Placentia, CA
- – Custom Painted Motorhomes Placentia, CA
- – Painting Fiberglass Motorhome Placentia, CA
- – Rv Paint Shop Near Me Placentia, CA
- – Rv Paint And Body Shops Near Me Placentia, CA
- – Motorhome Painting Placentia, CA
- – Motorhome Painting Near Me Placentia, CA
- – OCRV Center
Painting An Rv Placentia, CA
What a makeover!!! We had a very harsh 20 year old van. We disputed trading her in, but I'm so grateful we determined to paint it rather. The entire group was truly wonderful. You can inform every person enjoys what they do, and they are truly proficient at it as well. We were thrilled by the whole process - resolving her lots of scratches and dents, the fantastic layout, the regular development photos, and the completed outcomes! Currently we have something unique that is uniquely ours - and has all of our memories from our trips too! Truthfully can't say sufficient advantages concerning our experience with CDI.
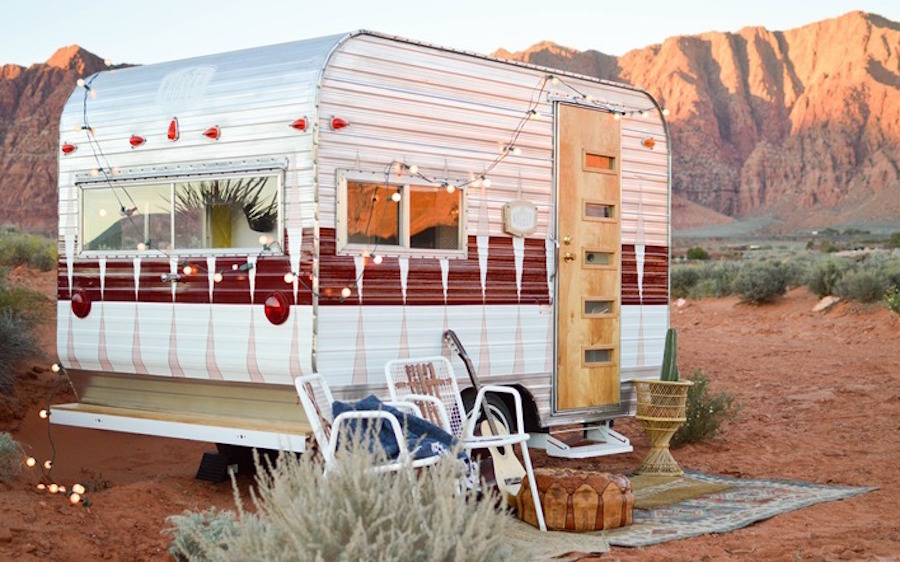
This visual photo is a representation of what your coach will look like with the design and colors you've chosen. Make certain to visit our visuals layout page to draw ideas for your very own personalized paint work. You'll find a slide show of several previous paint design renderings we have actually done on devices including fifth wheels, Class C, Class A and even more!.
After mindful factor to consider, Household RV Organization will be stopping the Forums efficient. This choice was not made gently. Among the primary challenges is that the forum software application we've counted on for over a decade is no much longer compatible with existing systems without significant redevelopment. The company no more supports our self-hosted setup and requires organizations to switch to a costly hosted plan or engage a third-party developer neither of which are feasible with our current top priorities.
Motorhome Painting Placentia, CA
It's clear that participants are now attaching and sharing experiences on newer systems that much better match modern expectations and way of lives. Stopping the forums provides us the chance to re-evaluate just how we can provide an extra modern, available, and appealing space for our members to link. We're exceptionally thankful to those of you that have added to the online forums over the years.
I do not follow the regulations for auto-body paint and perhaps not even for camper paint. I don't spray it, I don't make use of automobile paint.
Paint Rv Placentia, CA
Occasionally I do not also eliminate the stickers (gasp!). Am I humiliated to be seen with it after it has been repainted? Am I worried about it currently?
I constantly analyze a job prior to diving in and using any type of one technique. I will certainly constantly inspect the decals and effort to remove them initially. If you want to try to remove the decals, you will certainly intend to try the following supplies: The correct method to paint a recreational vehicle exterior entails getting rid of decals, power cleaning, taping and covering home windows and after that spraying on an auto grade paint with a paint sprayer.
Motorhome Paint Repair Placentia, CA
If you have actually been averted at specific campgrounds based upon your RV's look, you should repaint. Painting Fiberglass Motorhome Placentia. Here is what I do to prep the surface before paint: Lightly sand areas where the stickers are bubbling or peeling off up Power clean every little thing, including the roof Permit to dry extensively Seal up edges and around all home windows with a paintable caulk
Those points would certainly NOT come off. Now, the exterior siding on that particular trailer was wavy, not smooth. I believe getting rid of stickers from a smooth-sided trailer is simpler. I swore that day never ever to throw away that much time once again. I will certainly always inspect stickers and effort to remove them, yet if they resemble they aren't going anywhere and the camper is more than 20 years old, I will likely simply paint over them.
Paint Fiberglass Rv Placentia, CA
Our much older RV with smooth sides is holding well. The newer trailer with curly sides began to raise a little and I needed to retouch the paint. I think newer stickers may eventually bubble and lift, yet if your recreational vehicle is older than two decades, they stay.
I constantly suggest making use of an excellent gripping guide first, because it's tough to forecast exactly how well paint will comply with different surface areas. If you are painting right over an aluminum-sided trailer, you will certainly want to make use of a primer that is meant for direct-to-metal application. Painting Fiberglass Motorhome Placentia. Keeping that claimed, I have had rather great success with Behr Marquee outside paint and primer in one
It has generally been covered in one coat and held up well. I utilized a reduced appeal sheen (eggshell) on the outside of our 50's classic trailer due to the fact that there were numerous dents and blemishes in the house siding and I wanted a finish that would camouflage them much better. The drawback to this is that dirt does not slide off or wipe as nice as a high gloss.
I was hesitant to repaint over the stickers on our present Recreational vehicle with a semi-gloss paint, but I wanted to see if a semi-gloss would appear extra expert. Gripping Guide Latex Paint 3/8 snooze roller (you could additionally use 1/4 nap or a foam roller for a smoother coating) Tilted brush * I tried out with an oil based paint as soon as and it split and flaked off!
Motorhome Paint Repair Placentia, CA
In the end, I just went for it and never ever looked back! Why did I choose to roll the paint rather of splashing it?
Would a sprayer produce an even more also, smooth coating? Most likely, yes. Yet, due to the fact that of paint over the stickers, I have actually always figured the roller will certainly generate a somewhat distinctive coating that will hide the stickers. When the paint has actually dried and treated, I included enjoyable vinyl decals! I saw to it the surface area was clean and dry before applying.
Custom Rv Paint Jobs Placentia, CA
I additionally painted the door pink! I am always asked how well this method holds up.
These high website traffic locations take rather a beating, yet nevertheless, I have only ever seen mild damaging occur in time. Generally, I really feel that the improvement I obtain from paint and convenience of this approach deserve a few little chips occasionally. I always keep paint on hand for retouch.
Our team of Recreational vehicle paint and body professionals is here to aid. Whether you need a, specialist,, or small touch-ups, we have actually obtained you covered at our Motor home paint and body shop in Everett, Washington.
Examine out our past motorhome paint and body jobs, and set up a consultation with us today to! At our shop, we provide and fix solutions for both mechanized and towable instructors, consisting of and repairs. It's important to note that in some motorhomes, the windscreen must be resealed every couple of years to preserve a watertight gasket.
Rv Paint And Body Shops Near Me Placentia, CA
I wax it annually with a top quality wax and when I clean it I NEVER dry it ... just air completely dry. To do that you'll need a deionizer, well worth it as it reduces the moment substantially. As others have actually said, it simply looks sharp. And that recognizes, when it's time to market, it could be a lot more attractive than a non painted one? I question I'll obtain my full cash back in the FBP option.
When it comes to personalizing your motorhome, among the largest decisions you'll encounter is whether to cover or repaint your motor home. Both choices can provide your lorry a fresh, tailored lookbut they come with very different prices, procedures, and long-term effects. For several motor home owners, paint might appear like the standard path, however it often includes a substantial price and irreversible outcomes.

In this short article, we'll contrast vinyl covering vs. repainting a motorhome, damaging down the key distinctions in cost, resilience, upkeep, and design. If you're on the fence concerning which option is best for your motor home, this overview will help you make a positive choice. Vinyl wrapping includes using a huge sticky film straight over the recreational vehicle's exterior.
Rv Painter Placentia, CA
Repainting a RV can take numerous weeks, particularly when considering fining sand, priming, and drying times. A plastic cover, by comparison, can be completed in simply a few days, enabling you to return when driving much faster. Covered Motor homes require less effort to maintain tidy. There's no demand for waxing or polishing, just wash it with mild soap and water.
These are increasingly popular for individual RVs as a result of their sleek, underrated design. Include a costs or advanced side to your motorhome with metallic or chrome-effect vinyl. Offered in silver, gold, copper, and also color-shifting options, these wraps are excellent for those that wish to stand apart. Textured vinyl wraps simulate the appearance of genuine materials while including depth and tactile allure.
Ideal for: Company branding and mobile marketing Themed RVs for events or events Personalized art work or family members names Love the outdoors? Nature-themed wraps can include hills, woodlands, oceans, or deserts, excellent for adventure seekers that desire their motorhome to reflect their lifestyle and travel destinations. You don't need to cover the entire recreational vehicle to make a statement.
It protects your paint and can be eliminated cleanly if applied correctly. The surface area needs to be smooth and tidy for correct attachment.
Custom Painted Motorhomes Placentia, CA
Plus, we share leading product suggestions so your camper comes out looking fresh. To give both rigs a fresh new appearance, this is the outside painting method that we suggest. Desire to inspect out both remodellings?
Be certain to remove all stickers from locations that you intend to repaint. Never paint over decals. Make use of a warm gun to warm the sticker so that you can draw off the vinyl by hand.
Painting Fiberglass Motorhome Placentia, CA
Use the covering up paper to enclose bigger locations from the overspray. 4 After you've taped off the locations you want to repaint, sand down all locations of the camper that you intend to paint. Utilize an 80 grit fining sand block and lightly buff the outside to produce a smooth surface.
5 Next, wipe down the motor home's exterior with acetone and a microfiber cloth to get rid of any kind of oily deposit that could stop good adhesion. Dust from fining sand will spoil the paint texture. Clean the location down once again with a moist microfiber towel to ensure there is no dust. 6 Using a paint sprayer, use one layer of primer.
Rv Paint Shop Near Me Placentia, CA
If the paint looks irregular after drying out, scuff the surface once more and use an additional coat of paint. Depending on the condition that your motor home's exterior remained in and how well you performed in your preparation, you might require 2-3 layers of paint for a solid, smooth surface. 10 After the second (or third) coat of paint is dry, apply a clear topcoat.
This site uses cookies to assist personalise content, customize your experience and to maintain you visited if you sign up. By proceeding to use this website, you are granting our use of cookies.
Learn more about the recent uptick in van modifications, repaint corrections, body repair services, and facility upgrades needed to fulfill the higher need for motor home painting services. To find out more regarding CDI Personalized Paint check them out here They have some excellent instances of before and after images of work they have done in addition to videos.
Discover out how you can easily find Clean Container supplier solutions and utilize the increasing dealer network. The segment better distinguishes the supremacy of expert storage tank cleansing solutions over open market options, stressing a specialized process that averts waste buildup in holding storage tanks. The podcast touches on the synergy in between a cleaning service company and the FMCA, presenting unique discounts for FMCA participants.
Rv Paint And Body Shops Near Me Placentia, CA
To get more information about Kleen Container and obtain the complimentary recipe for a powerful tank service visit them right here and if you remain in the North Carolina area get in touch with Jack directly at 252-236-1023. Have a question for us? Intend to request a certain visitor on the program? Leave us a message down in the remark section or through our Contact Us page.
We talked with individuals from Mike's Custom Paint in Bremen, In. Regarding doing a complete repaint of our 1999 DSDP.From what they claimed, and what you can see on their internet site, I have little uncertainty they would certainly do a first rate job.
High quality of materials and handiwork are what I'm trying to find. If you have comments you prefer to not post on the forum, please send them to me at:! Bob.
Recognized as chameleon paint, this paint work adjustments in shade depending on the watching angle and light source. It requires a three-stage painting process.
Motorhome Painting Placentia, CA
2. Offer a TSP clean to your motorhome's insides so that the guide will certainly comply with the wallpaper finishing. Search for in the owner's guidebook for referrals on the TSP you can make use of to remove all the dirt and grime. 3. Once this is done, make use of the hand-masker dispenser to cover all areas that you intend not to paint on.
If you wish to replace the floor covering, you can let it be. 4. Take out the guide currently and start applying it on the motorhome's interior surface areas. Make use of a good-quality item for an extensive and professional surface. Commonly, latex-based primers work better on camper wall surfaces as contrasted to oil-based guides, which are optimal for the concrete wall surfaces of homes.
Motorhome Painting Near Me Placentia, CA
Once the primer is dry, currently is the time to repaint. Pick a paint type as per the support of the camper's OEM and narrow down your list of preferred shades.
OCRV Center
Address: 23281 La Palma Ave Yorba Linda, CA 92887Phone: (714) 909-1444
Email: art@ocrvcenter.com
OCRV Center
6. If you are a pro at it, you can do an excellent work with brushes and rollers. Wait on a coat to dry correctly before you use the second one. For painting the ceilings and closets, you can take advantage of the sprayer. This will certainly speed up the job and give an expert finish to the task.
Motorhome Custom Paint Jobs Placentia, CARv Paint Shop Near Me Placentia, CA
Motorhome Paint Shops Placentia, CA
Custom Painted Motorhomes Placentia, CA
Rv Painting Near Me Placentia, CA
Motorhome Custom Paint Placentia, CA
Motorhome Paint Shops Placentia, CA
Rv Exterior Paint Placentia, CA
Rv Paint Shop Near Me Placentia, CA
Paint Fiberglass Rv Placentia, CA
Rv Paint Job Placentia, CA
Custom Motorhome Paint Jobs Placentia, CA
Paint Rv Placentia, CA
Motorhome Painting Near Me Placentia, CA
Rv Paint Shop Near Me Placentia, CA
Rv Painter Placentia, CA
Rv Paint Placentia, CA
Painting An Rv Placentia, CA
Motorhome Paint Repair Placentia, CA
Motorhome Custom Paint Jobs Placentia, CA
Rv Paint Repair Placentia, CA
Motorhome Painting Placentia, CA
Rv Painting Placentia, CA
Motorhome Paint Repair Placentia, CA
Rv Paint And Body Shops Near Me Placentia, CA
Custom Rv Paint Jobs Placentia, CA
Rv Paint Repair Placentia, CA
Motorhome Paint Shops Placentia, CA
Custom Motorhome Paint Jobs Placentia, CA
Painting Fiberglass Motorhome Placentia, CA
Custom Rv Paint Placentia, CA
Custom Motorhome Paint Jobs Placentia, CA
Rv Paint Shop Near Me Placentia, CA
Motorhome Paint Shops Placentia, CA
Rv Paint Shop Near Me Placentia, CA
Paint Fiberglass Rv Placentia, CA
Motorhome Paint Repair Placentia, CA
Motorhome Paint Repair Placentia, CA
Rv Paint Job Placentia, CA
Motorhome Custom Paint Jobs Placentia, CA
Rv Painting Placentia, CA
Custom Motorhome Paint Jobs Placentia, CA
Painting Fiberglass Motorhome Placentia, CA
Painting An Rv Placentia, CA
Rv Painter Placentia, CA
Rv Painter Placentia, CA
Paint Rv Placentia, CA
Motorhome Custom Paint Jobs Placentia, CA
Motorhome Paint Repair Placentia, CA
Painting Fiberglass Motorhome Placentia, CA
Painting An Rv Placentia, CA
Rv Paint Placentia, CA
Rv Paint Placentia, CA
Motorhome Paint Shops Placentia, CA
Rv Paint And Body Shops Near Me Placentia, CA
Motorhome Painting Near Me Placentia, CA
Rv Paint Job Placentia, CA
Rv Exterior Paint Placentia, CA
Motorhome Custom Paint Placentia, CA
Paint Motorhome Exterior Placentia, CA
Class A Rv Custom Paint And Repair Placentia, CA
Custom Painted Motorhomes Placentia, CA
Rv Painting Placentia, CA
Custom Rv Paint Jobs Placentia, CA
Motorhome Painting Near Me Placentia, CA
Custom Painted Motorhomes Placentia, CA
Custom Painted Motorhomes Placentia, CA
Painting Rv Walls Placentia, CA
Painting Rv Exterior Placentia, CA
Custom Rv Paint Placentia, CA
Painting Rv Exterior Placentia, CA
Painting An Rv Placentia, CA
Custom Painted Motorhomes Placentia, CA
Painting Fiberglass Motorhome Placentia, CA
Motorhome Custom Paint Jobs Placentia, CA
Paint Rv Placentia, CA
Painting Rv Walls Placentia, CA
Motorhome Painting Placentia, CA
Best Seo Plans Placentia, CA
Close To Me Seo Optimization Placentia, CA
OCRV Center
Table of Contents
- – Painting An Rv Placentia, CA
- – OCRV Center
- – Motorhome Painting Placentia, CA
- – Paint Rv Placentia, CA
- – Motorhome Paint Repair Placentia, CA
- – Paint Fiberglass Rv Placentia, CA
- – Motorhome Paint Repair Placentia, CA
- – Custom Rv Paint Jobs Placentia, CA
- – Rv Paint And Body Shops Near Me Placentia, CA
- – Rv Painter Placentia, CA
- – Custom Painted Motorhomes Placentia, CA
- – Painting Fiberglass Motorhome Placentia, CA
- – Rv Paint Shop Near Me Placentia, CA
- – Rv Paint And Body Shops Near Me Placentia, CA
- – Motorhome Painting Placentia, CA
- – Motorhome Painting Near Me Placentia, CA
- – OCRV Center
Latest Posts
Restaurant Hood Cleaning Near Me San Gabriel
Commercial Kitchen Ventilation Services Burbank
La Crescenta Ac Installation
More
Latest Posts
Restaurant Hood Cleaning Near Me San Gabriel
Commercial Kitchen Ventilation Services Burbank
La Crescenta Ac Installation