All Categories
Featured
Table of Contents
- – 5th Wheel Repair Near Me Villa Park, CA
- – OCRV Center
- – Travel Trailer Awning Replacement Villa Park, CA
- – Rv Trailer Repair Shop Villa Park, CA
- – Fifth Wheel Service Villa Park, CA
- – Trailer Floor Repair Villa Park, CA
- – Camper Trailer Service Villa Park, CA
- – Cargo Trailer Repair Villa Park, CA
- – 5th Wheel Repair Near Me Villa Park, CA
- – Travel Trailer Siding Repair Villa Park, CA
- – Horse Trailer Repairs Villa Park, CA
- – Trailer Roof Repair Villa Park, CA
- – Horse Trailer Repair Near Me Villa Park, CA
- – OCRV Center
5th Wheel Repair Near Me Villa Park, CA
The more you use your trailer, the a lot more it's important to preserve your slide. Our team will certainly inspect for proper sealing, procedure and lubrication to keep it in working order.
Normal upkeep extends your trailer's efficiency, stopping a requirement to change it sooner. Proper trailer maintenance can aid protect against expensive repair services down the line. Our group boasts decades of mixed market experience for unequaled experience. Smart owners like you consistently choose Big Tex Trailer Globe as their companion for horse and livestock trailer services since: We have places throughout the United States with the services and proficiency you can rely on.
Horse At Turnbow Trailers in Oklahoma, we boast of our background. Several years of effort have entered into making this company and the custom trailers we produce the most effective in the nation today. Carl and Grace Turnbow started Turnbow Trailers in 1960, armed with nothing greater than a little cash, lots of intestines and a dream.
Travel Trailer Awning Replacement Villa Park, CA
Carl and Poise are both in the office every day, looking after the procedure and making certain things are done. The majority of everybody below is a veteran of the trailer company and 90 percent of our individuals have been right here for one decade or more. It's this commitment and commitment to our craft that assists us transform out the type of horse trailers we make.
We are frequently transforming and boosting our trailers to fulfill the requirements of today's requiring horse sector. We like to think we're large sufficient to satisfy all your trailer requires, yet small adequate to provide each client the personal focus they are worthy of. When you acquire a Turnbow Trailer, you can feel confident that you have actually gotten the most effective trailer at the most effective cost offered today.
Rv Trailer Repair Shop Villa Park, CA
is more than simply a RV service center; we're a three-way hazard in the market. Most importantly, our servant's heart drives us to exceed and beyond for our clients. Second, our team has substantial motor home repair work and trailer maintenance expertise and know-how. Third, we focus on searching for and setting up the perfect accessories for your automobile, ensuring you're well-appointed for your next experience.

Boespflug Trailers has actually been a family-owned and operated organization considering that 1983 with generations of experience. The present owners have actually been a part of operations beginning in the mid-'90s. In 1986 Boespflugs opened up a store front on East Villard in Dickinson, ND. In 1997 a larger facility was built with customer needs in mind to permit increased sales and service possibilities.
You can count on our service proficiency for many years ahead with our reputable service technicians and extensive parts stock. You can select from our in-stock trailer inventory or unique order a tailored unit to your specifications. To guarantee the ideal value for you, we aim to equip just product that provide high quality, durability, and worth.
Our service shop supplies specialist, timely repair services or construction on most trailers approximately 30,000 # GAWR, consisting of recreational vehicle's. We additionally mount drawbacks on tow cars. We have transportation experts to make sure fast, damage-free shipment of your system. We can deliver throughout the United States (reduced 48 and Alaska) and Canada.
Fifth Wheel Service Villa Park, CA
When you're spent in making certain your trailer remains in magnum opus order for years to find, you require knowledge and ability you can count on. Our extremely educated service technicians are dedicated to keeping and servicing your Kingston Trailers, 4 Star Trailers, Hawk Trailers so you can obtain one of the most out of your purchase.
This labor intensive service eliminates unsightly black streaks and various other pollutes from your trailers paint. Deep clean the interior of your steed trailer to eliminate developed contaminates and odors. * Rates for all solutions depends on the size and condition of trailer * We are pleased to offer high quality service in the Pottstown location.
It is with fantastic pleasure that we provide to you our carefully picked variety of products that have actually become an essential part of our organization.
When you're spent in seeing to it your trailer, such as a vehicle hauler, dump, confined, or utility trailer stays in excellent functioning order for many years ahead, you require knowledge and ability you can rely on. Our very educated service technicians are committed to keeping and servicing your trailer so you can get the most out of your purchase.
Trailer Floor Repair Villa Park, CA
Reliability is essential when there's a work to do and we have the equipment and experience to obtain your trailer back on the road. Give us a call and we'll obtain you in and out of the store in an effective and prompt way. Jimmy's Automobile Fixing & Trailer Supply is honored to supply high quality solution near the areas of Culpeper, Fredericksburg, Warrenton, Manassas, and Fairfax.
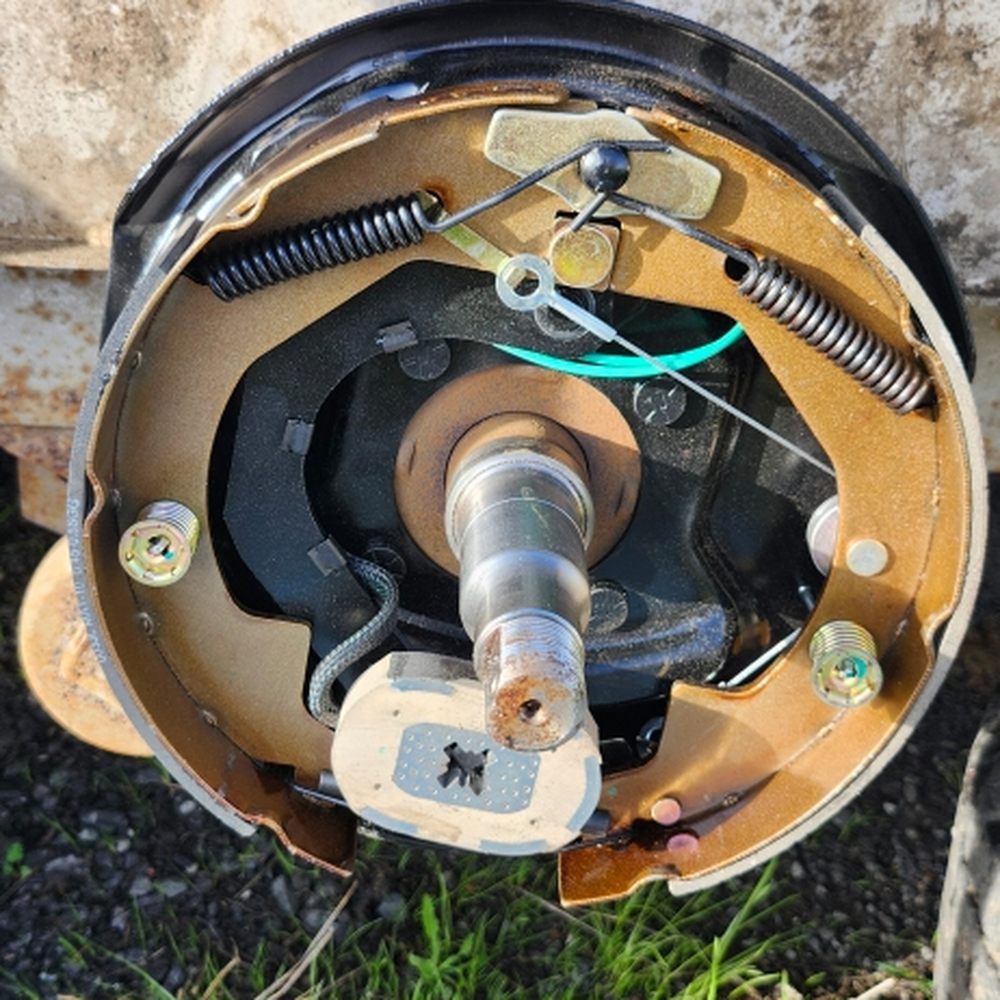
Don't be deceived into thinking your local gasoline station is a trailer specialist. Cars and truck brakes are various from trailer brakes and automobiles do not have breakaway systems, and so on. Horse trailers are what we do and our manufacturing facility educated auto mechanics specialize in completing maker advised yearly trailer solution. Preventative upkeep has to do with safety and savings.
Axle manufactures advise that brakes be serviced annually. Our yearly solution bundle includes complete cleaning, evaluating and repacking the bearings, changing the seals and cotter pins or tang washers. Cleaning, lubing and adjusting the brakes. Also consisted of is full assessment of the axles, framework, floor, doors and ramp. The breakaway system is checked along with all electric elements.
All moving components are oiled. Keeping your trailer appropriately serviced maintains you and your steeds safe. All makes and models of vehicles and trailersAnnual preventative maintenance for equine trailersB & W gooseneck hitches, frame tow hitches installedBrake control setup and truck electrical wiring for all makes and modelsAll types of electric fixing and serviceSteel and light weight aluminum manufacture for all sorts of trailersWeight dispersing hitchesPre-purchase safety and security checks.
Camper Trailer Service Villa Park, CA
, we are your ONE-STOP Store for all things trailer associated in New York, NY., however we likewise provide trailer repair work.
Whether using an energy trailer for organization or individual use, it is crucial to remain current on maintenance. Trailers, tow hitches, and so forth come in all forms and dimensions, so you always intend to have a professional double-check compatibility as well as all electric and safety attributes before every tons.
From small issues to major work, Hitch King's trailer repair work services will keep you roadworthy and your cargo secure. Our specialists function hard due to the fact that we recognize you do, as well.
For a totally free quote on any service at our area in New York City City, provide the Hitch Pros a call today at, or demand a quote online now.
Cargo Trailer Repair Villa Park, CA
If you have actually ever been to our store, you will swiftly see that horse trailers are our specialized. We created a special bond with several clients over the years who return year after year to ensure they have a secure trailer prior to they transport any one of their steeds. A number of our on-site services are carried out at horse barns.
Lots of horse proprietors simply desire us to carry out a security check. They need to know their trailer is safe for their precious steeds due to the fact that allow's face it, some individuals like their steeds more than they like people. That's okay. We obtain it and we take our obligations significant to making certain everyone a secure experience.
5th Wheel Repair Near Me Villa Park, CA
Anything from kicking a door to peing on the floor boards creating wetness in between the mat and the timber. We change a great deal of timber floorings ensuring the architectural honesty of the trailer and a safe experience for the steeds. We additionally do a lot of warm stress washing of the inside and beyond horse trailers.
We are a family-run service and we hire our staff members with the exact same honesty and sectarian way of thinking as the owner. If you ask about, possibilities are a person has actually come across Shawn in all Mac. The majority of the moment, he is the one that addresses the phone. We also push washed the within of an equine barn.
Travel Trailer Siding Repair Villa Park, CA
"I put a whole lot of miles on my horse trailer going to shows all over the country. Trudy Midas, EspanaSilk "We take a trip over 12,000 miles per year with our LQ equine trailer and there's essentially no means we might do it without Shawn's assistance.
As a woman that often travels alone cross nation with my kids and equines, having Shawn and his team at ALL-MAC preserve and fix my gear provides me (and my husband) the confidence I need to strike the roadway and understand we will certainly be risk-free. The bottom line is that Shawn and his group are the most effective and I very recommend them!" Kristy Gusick "The comfort your firm gives me is priceless" Sarah Hoban "We align our trailers and All Mac invests the day doing what would take us days if he needed to relocate all of our trailers to an additional area to get repaired.
When you're purchased ensuring your trailer keeps in magnum opus order for years to come, you require knowledge and ability you can trust. Our very trained professionals are dedicated to keeping and servicing your Kingston Trailers, 4 Celebrity Trailers, Hawk Trailers so you can obtain one of the most out of your acquisition.
Horse Trailer Repairs Villa Park, CA
This labor intensive solution removes ugly black streaks and other pollutes from your trailers paint. Travel Trailer Repairs Villa Park. Deep tidy the interior of your horse trailer to remove accumulated contaminates and odors. * Prices for all solutions relies on the size and problem of trailer * We are pleased to provide quality solution in the Pottstown area
Offering Farmington Hills, Farmington, Novi, Livonia, Northville Given That 1958 When it pertains to your steeds, safety always comes initially. Before you fill your horses right into the trailer, be certain to hook up and perform a brief inspection of the tires and lights. Maintain a tire scale convenient and examine that the tire is holding the appropriate stress (known as PSI).
Dry rot can occur also if the tire tread still looks fantastic, and when those splits reveal up, your tire ends up being compromised. And once more, keep in mind to examine your spare tires too. Due to completely dry rot, you ought to intend on changing tires every 3 to five years despite look. Always examine the pressure when the tires are chilly.
Trailer Roof Repair Villa Park, CA
And don't forget the spare tires. The correct pressure for your equine trailer tires is situated exactly on the tires. The majority of tire blowouts occur because a tire wasn't appropriately inflated, so take a couple of mins to inspect before you leave. Steed trailers call for certain tires, largely due to the load they're bring.
As with any road car, your horse trailer is mosting likely to need and occasional repair work solution to keep it executing at its ideal. Numerous steed trailer owners are uncertain exactly how to properly take care of their trailer, so we have actually produced this overview to aid with some usual problems. Constantly refer to the owner's manual for particular details about your trailer design.
Horse Trailer Repair Near Me Villa Park, CA
OCRV Center
Address: 23281 La Palma Ave Yorba Linda, CA 92887Phone: (714) 909-1444
Email: art@ocrvcenter.com
OCRV Center
If you are a useful individual, it may be tempting to work with a horse trailer on your own at home. We strongly advise that you allow a certified professional execute any type of repair work or update work on your trailer. Of all, a specialist will certainly make certain that the work is done appropriately without any type of damage to your trailer.
Rv Trailer Repair Near Me Villa Park, CATravel Trailer Furniture Villa Park, CA
Trailer Roof Repair Villa Park, CA
Travel Trailer Repairs Villa Park, CA
Horse Trailer Repairs Villa Park, CA
Horse Trailer Repair Near Me Villa Park, CA
Horse Trailer Repair Near Me Villa Park, CA
Rv Trailer Repair Near Me Villa Park, CA
Trailer Windows Replacement Villa Park, CA
Travel Trailer Repairs Villa Park, CA
Travel Trailer Repairs Villa Park, CA
Trailer Restoration Villa Park, CA
Rv Trailer Repair Shops Near Me Villa Park, CA
Travel Trailer Roof Replacement Villa Park, CA
Travel Trailer Floor Repair Villa Park, CA
Rv Trailer Repair Near Me Villa Park, CA
5th Wheel Repair Near Me Villa Park, CA
Rv Trailer Repair Shops Near Me Villa Park, CA
Fifth Wheel Service Villa Park, CA
Travel Trailer Service Villa Park, CA
Travel Trailer Replacement Windows Villa Park, CA
Trailer Windows Replacement Villa Park, CA
Travel Trailer Repairs Villa Park, CA
Travel Trailer Furniture Villa Park, CA
Travel Trailer Window Replacement Villa Park, CA
Travel Trailer Awning Replacement Villa Park, CA
Travel Trailer Floor Repair Villa Park, CA
Trailer Windows Replacement Villa Park, CA
Cargo Trailer Repair Villa Park, CA
Trailer Roof Repair Villa Park, CA
Travel Trailer Window Replacement Villa Park, CA
Travel Trailer Service Villa Park, CA
Fifth Wheel Service Villa Park, CA
Rv Trailer Repair Shop Villa Park, CA
Travel Trailer Window Replacement Villa Park, CA
Travel Trailer Floor Repair Villa Park, CA
Travel Trailer Window Replacement Villa Park, CA
Travel Trailer Ceiling Repair Villa Park, CA
Travel Trailer Awning Replacement Villa Park, CA
Travel Trailer Awning Replacement Villa Park, CA
Travel Trailer Roof Replacement Villa Park, CA
Trailer Windows Replacement Villa Park, CA
Trailer Floor Repair Villa Park, CA
Horse Trailer Repair Near Me Villa Park, CA
Horse Trailer Repair Near Me Villa Park, CA
Travel Trailer Ceiling Repair Villa Park, CA
Travel Trailer Replacement Windows Villa Park, CA
Camper Floor Repair Near Me Villa Park, CA
Cargo Trailer Repair Villa Park, CA
Trailer Floor Repair Villa Park, CA
Travel Trailer Ceiling Repair Villa Park, CA
Camper Floor Repair Near Me Villa Park, CA
Camping Trailer Repair Near Me Villa Park, CA
5th Wheel Repair Near Me Villa Park, CA
Trailer Window Replacement Villa Park, CA
Horse Trailer Repair Near Me Villa Park, CA
Travel Trailer Ceiling Repair Villa Park, CA
Travel Trailer Window Replacement Villa Park, CA
Rv Trailer Repair Shops Near Me Villa Park, CA
Trailer Floor Repair Villa Park, CA
Travel Trailer Ceiling Repair Villa Park, CA
Travel Trailer Furniture Villa Park, CA
Cargo Trailer Repair Villa Park, CA
Travel Trailer Ceiling Repair Villa Park, CA
Rv Trailer Service Near Me Villa Park, CA
Rv Trailer Repair Shops Near Me Villa Park, CA
Travel Trailer Roof Replacement Villa Park, CA
Fifth Wheel Repair Near Me Villa Park, CA
Fifth Wheel Repair Near Me Villa Park, CA
5th Wheel Repair Near Me Villa Park, CA
Rv Trailer Repair Near Me Villa Park, CA
Horse Trailer Repair Near Me Villa Park, CA
Travel Trailer Replacement Windows Villa Park, CA
Travel Trailer Siding Repair Villa Park, CA
Camping Trailer Repair Near Me Villa Park, CA
Fifth Wheel Service Villa Park, CA
Travel Trailer Siding Repair Villa Park, CA
Rv Trailer Repair Shops Near Me Villa Park, CA
Around Me Seo Specialist Villa Park, CA
Close By Seo Packages Villa Park, CA
OCRV Center
Table of Contents
- – 5th Wheel Repair Near Me Villa Park, CA
- – OCRV Center
- – Travel Trailer Awning Replacement Villa Park, CA
- – Rv Trailer Repair Shop Villa Park, CA
- – Fifth Wheel Service Villa Park, CA
- – Trailer Floor Repair Villa Park, CA
- – Camper Trailer Service Villa Park, CA
- – Cargo Trailer Repair Villa Park, CA
- – 5th Wheel Repair Near Me Villa Park, CA
- – Travel Trailer Siding Repair Villa Park, CA
- – Horse Trailer Repairs Villa Park, CA
- – Trailer Roof Repair Villa Park, CA
- – Horse Trailer Repair Near Me Villa Park, CA
- – OCRV Center
Latest Posts
Best Partd Insurance Company For Seniors Mission Viejo
Aliso Viejo Best Dental Insurance Seniors
Health Insurance Plans Near Me Garden Grove
More
Latest Posts
Best Partd Insurance Company For Seniors Mission Viejo
Aliso Viejo Best Dental Insurance Seniors
Health Insurance Plans Near Me Garden Grove